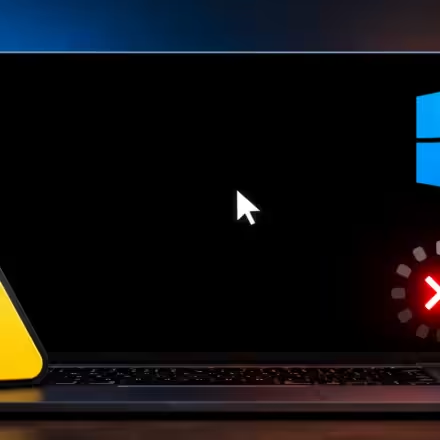


You type your PIN, the login screen clears, and then the desktop just… doesn’t show up. Black wallpaper, no taskbar, no icons sometimes a cursor floating around, sometimes not even that.
Table Of Content
- Quick Answer
- Quick Diagnosis: What’s Probably Wrong
- What Causes a Black Screen After Login
- Fix 1: Force a Graphics Driver Refresh
- Fix 2: Rule Out Display, Cable, and Peripheral Issues
- Fix 3: Restart Windows Explorer from Task Manager
- Fix 4: Relaunch explorer.exe as a New Task
- Fix 5: Disable Fast Startup
- Fix 6: Disable Startup Apps and Background Programs
- Fix 7: Boot Into Safe Mode
- Fix 8: Run an SFC Scan
- Fix 9: Run a DISM Repair
- Fix 10: Run CHKDSK
- Fix 11: Roll Back or Reinstall Your Graphics Driver
- Fix 12: Use System Restore
- Fix 13: Run Startup Repair
- Fix 14: Uninstall the Most Recent Windows Update
- Fix 15: New User Profile or Full Reset (Last Resort)
- Troubleshooting Table
- When It’s Probably Hardware, Not Software
- How Long Should You Actually Wait?
- Common Mistakes to Avoid
- How to Prevent This From Happening Again
- Signs the Problem Is Actually Fixed
- Related Problems Worth Knowing About
- When to Contact Microsoft or a Repair Shop
- Summary: Which Fixes to Try First
- FAQ
The good news, and it’s worth hearing before anything else: this is almost never a sign of a dying PC. Eight times out of ten, it’s the desktop shell, a graphics driver, or a recent update tripping over itself during login not a failed drive or a fried motherboard.
It shows up most often right after a Windows Update, a driver change, or when Fast Startup gets in the way. Work through the fixes below in order, starting with the fastest and least invasive, and stop the moment your desktop comes back.
Quick Answer
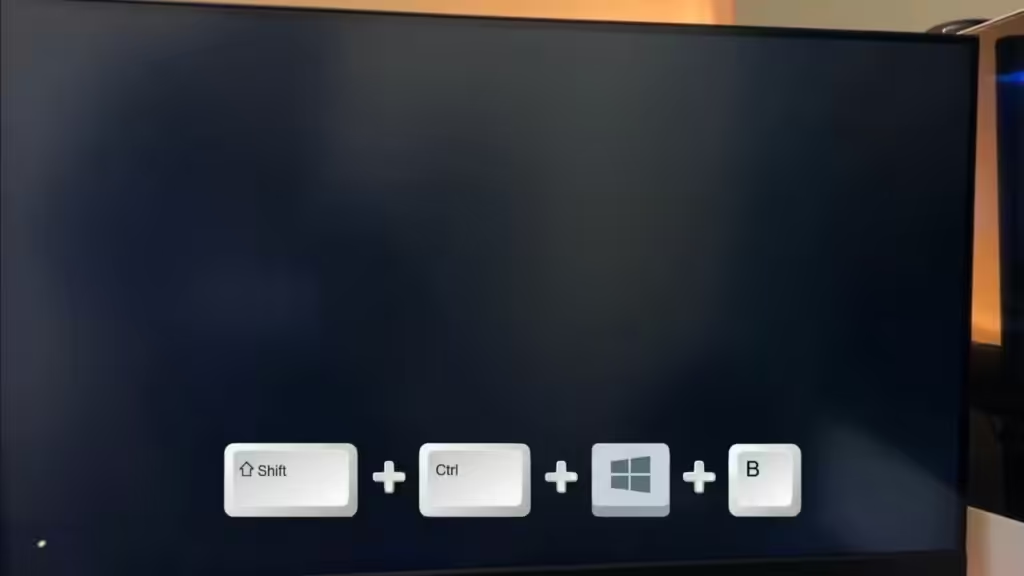
Most cases of a black screen after login come down to three things: Windows Explorer failing to load, a graphics driver conflict, or a half-installed update. Start with Windows key + Ctrl + Shift + B to force a driver reset, then try restarting Explorer through Task Manager Ctrl + Alt + Delete usually still opens even on a black screen.
If Task Manager won’t come up at all, skip straight to Safe Mode. Keep System Restore, Startup Repair, and a full reset in reserve for when the quick fixes don’t stick; most people never get that far.
Quick Diagnosis: What’s Probably Wrong
Before working through fifteen fixes one by one, it helps to narrow things down. Ask yourself these three questions:
| Question | If yes | If no |
|---|---|---|
| Does Ctrl + Alt + Delete bring up any menu at all? | Windows core is running likely Explorer or a driver issue | Something’s blocking the system earlier in boot go to Safe Mode |
| Did this start right after an update or driver install? | Strongly points to that specific change jump to Fix 11 or Fix 14 | Cause is less obvious work through fixes in order |
| Does the cursor move smoothly when you nudge the mouse? | Windows is running, just not drawing the desktop a software fix will very likely work | If the cursor is frozen or absent too, treat it as a deeper fault and consider hardware causes sooner |
That third question matters more than people expect. A cursor that moves freely means the kernel, the input drivers, and the graphics pipeline are all functioning you’re looking at a rendering or shell problem, which is about as fixable as this gets. A completely frozen screen, with no cursor movement at all, shifts the odds toward something lower-level: a stuck driver, a hung boot process, or occasionally a hardware fault.
What Causes a Black Screen After Login
A short list of culprits accounts for the vast majority of cases:
- Windows Explorer crashed or never started. Explorer.exe is the process that draws your desktop, taskbar, and icons. When it hangs partway through login, everything else running underneath it is often fine you just can’t see any of it.
- A corrupted or incompatible graphics driver. This shows up most often right after Windows Update pushes a new driver, or after installing one manually from NVIDIA, AMD, or Intel. On systems with dedicated NVIDIA or AMD graphics, a mismatched driver version is one of the more common triggers we see.
- A failed or partially installed Windows Update. Annual feature updates are the classic cause, but a routine cumulative update can do it too, especially if the PC lost power or was forced to restart mid-install.
- Fast Startup interference. Fast Startup saves a snapshot of your session so the next boot is quicker. If that snapshot gets corrupted which tends to happen around update installs you boot straight into a broken state instead of starting clean.
- A second monitor or external display conflict. Windows sometimes tries to send your desktop to a display that’s no longer connected, or one whose resolution and refresh rate no longer match what Windows expects.
- Corrupted system files. Damage to core Windows components can stop the shell from initializing properly, even though the operating system technically boots.
- A corrupted user profile. If one account’s settings are damaged, that account alone might fail to load a desktop while every other account on the same PC works normally.
- Startup programs or services fighting each other. Overlay software, older antivirus suites, and some cloud-sync clients hook into the login sequence if one hangs, it can block the shell from ever appearing.
- Disk errors. Bad sectors or file system corruption on the drive holding Windows can delay the desktop indefinitely or prevent it from loading at all.
- GPU hardware problems. Less common than the software causes above, but a failing graphics card, a loose cable, or (on laptops) a damaged display connector produces an identical symptom.
Pro tip: If Ctrl + Alt + Delete brings up the menu with Task Manager, Lock, and Sign Out options but the desktop behind it stays black that’s about as strong a signal as you’ll get that Windows Explorer crashed rather than anything more serious. Head straight to Fix 3 and skip the earlier steps if you’re in a hurry.
Fix 1: Force a Graphics Driver Refresh
Why it works: Windows has a built-in shortcut that tells the graphics driver to restart itself in place, without rebooting the whole PC. If the black screen is a display-driver hiccup the driver locked up, or lost sync with the monitor this clears it in seconds because it doesn’t touch anything else running underneath.
Difficulty: Easy | Time required: Under 1 minute | Risk level: None
When to use it: Always try this first, before anything else. It costs nothing, doesn’t close any programs, and resolves a surprising share of cases outright.
When not to use it: If the screen has been black for more than a few minutes with zero cursor movement, this shortcut isn’t going to be enough on its own move to Fix 3 or Fix 7 instead of repeating it.
Steps: 1. Press Windows key + Ctrl + Shift + B all at once, not one after another. 2. If your sound is on, you’ll usually hear a short beep, and the screen may flicker or briefly go black. 3. Give it 5 to 10 seconds the driver needs a moment to reinitialize.
Expected result: The screen flashes once, then your normal desktop reappears as if nothing happened.
Common mistakes: Pressing the keys in sequence instead of together, or trying it once and moving on it’s worth two attempts before ruling it out.
If it doesn’t work: Go to Fix 2 if you suspect a display or cable problem, or straight to Fix 3 if the pattern points to Explorer.
Fix 2: Rule Out Display, Cable, and Peripheral Issues
Why it works: Windows occasionally decides to send your desktop to the wrong output a second monitor that’s no longer connected, a docking station port, or a TV you plugged in once and forgot about. A loose or failing cable produces exactly the same black-screen symptom as a software fault, and it’s the one cause that has nothing to do with Windows at all.
Difficulty: Easy | Time required: 2–5 minutes | Risk level: None
When to use it: If you regularly use an external monitor, a docking station, or a projector or if you recently plugged one in or unplugged one.
When not to use it: If you’re on a single-display desktop or laptop setup with nothing external connected, this fix won’t apply and you can skip to Fix 3.
Steps: 1. Press Windows key + P to open the display projection menu, then use the arrow keys and Enter to pick “PC screen only.” 2. Check that the monitor cable is seated firmly at both ends. If you have a spare cable or a different port, try it. 3. If a second monitor is connected, unplug it and reboot with only the primary display attached. 4. On a laptop, try an external monitor if one’s available that tells you immediately whether the built-in panel is the problem or Windows is.
Expected result: If display routing was the issue, the desktop shows up correctly on the intended screen the moment the output path is fixed.
Common mistakes: Assuming a laptop’s built-in screen has failed without testing an external display first that single test separates a hardware problem from a software one in under a minute.
If it doesn’t work: Reconnect your usual setup and move on to Fix 3.
Fix 3: Restart Windows Explorer from Task Manager
Why it works: Windows Explorer is the one process responsible for everything you’d normally call “the desktop” taskbar, Start menu, icons, open File Explorer windows. When it crashes but the rest of Windows keeps running underneath, restarting that single process brings the visible interface back without touching anything else you have open.
Difficulty: Easy | Time required: 1–2 minutes | Risk level: None your open files and running apps aren’t affected
When to use it: Any time you can open Task Manager, even on the black screen, via Ctrl + Alt + Delete or Ctrl + Shift + Esc. This is the single most useful fix on this list and worth trying early.
When not to use it: If Task Manager itself won’t open no matter what you try, this fix isn’t reachable go straight to Fix 7 (Safe Mode).
Steps: 1. Press Ctrl + Shift + Esc to open Task Manager directly, or Ctrl + Alt + Delete and choose Task Manager from the menu that appears. 2. If you see a short, simplified list, click “More details” in the bottom-left corner to expand it. 3. Go to the Processes tab and find Windows Explorer in the list. 4. Right-click it and choose Restart.
Expected result: The screen flickers briefly, then your desktop, taskbar, and icons reload within a few seconds.
Common mistakes: Clicking “End task” instead of “Restart.” Ending the process leaves you on a black screen with nothing running the shell not dangerous, but it means you’ll need Fix 4 to bring it back manually.
If it doesn’t work: If Windows Explorer isn’t in the list at all, that means it never started go to Fix 4 and launch it fresh instead of trying to restart something that isn’t running.
Fix 4: Relaunch explorer.exe as a New Task
Why it works: Restarting a process only works if the process exists to restart. If Explorer never launched in the first place which is different from it crashing after launch there’s nothing in the list to right-click. Starting it manually as a new task launches it from scratch.
Difficulty: Easy | Time required: 1–2 minutes | Risk level: None
When to use it: When Windows Explorer doesn’t appear anywhere in the Task Manager process list, or when restarting it in Fix 3 brought it up briefly and then it vanished again.
Steps: 1. Open Task Manager (Ctrl + Shift + Esc). 2. Click File in the top-left corner, then Run new task. 3. Type explorer.exe and press Enter, or click OK.
Expected result: The desktop shell loads as though you’d just logged in fresh.
Common mistakes: Typing “explorer” without the “.exe” extension. It’ll usually still resolve correctly, but including the extension avoids any chance of Windows misinterpreting the command.
If it doesn’t work: If explorer.exe launches and crashes again within seconds, that’s a sign of something deeper a corrupted system file, a failing update, or a driver conflict. Continue on to Fix 5 through Fix 10 rather than repeating this one.
Fix 5: Disable Fast Startup
Why it works: Fast Startup isn’t a true shutdown it’s closer to a partial hibernation that saves the kernel and drivers to a file so the next boot skips some of the usual initialization. That’s normally harmless, but if the saved snapshot gets corrupted (which tends to happen around update installs or unexpected power loss), every subsequent boot loads that broken snapshot instead of starting clean.
Difficulty: Easy | Time required: 5 minutes | Risk level: Low
When to use it: If the black screen began right after a Windows Update, or if it’s inconsistent working on some boots and failing on others, which is a classic Fast Startup fingerprint.
When not to use it: If the black screen has been consistent since day one on a new install, Fast Startup is unlikely to be the cause and you’re better off starting with Fix 3 or Fix 7.
Steps: 1. If you can reach the desktop briefly, or you’re already in Safe Mode, press Windows key + R, type control panel, and press Enter. 2. Go to Hardware and Sound > Power Options. 3. Click “Choose what the power buttons do” on the left side. 4. Click “Change settings that are currently unavailable” this needs administrator rights. 5. Uncheck “Turn on fast startup (recommended).” 6. Click Save changes, then fully shut down not restart and power the machine back on.
Expected result: The next boot starts genuinely fresh, with no leftover snapshot, which resolves black screens caused by Fast Startup corruption.
Common mistakes: Restarting instead of shutting down. A restart doesn’t clear the existing saved state only a full shutdown followed by powering back on does that.
If it doesn’t work: Move on to Fix 6.
Fix 6: Disable Startup Apps and Background Programs
Why it works: Plenty of third-party software inserts itself into the login sequence overlay tools for gaming, older antivirus suites, cloud-sync clients, even some keyboard and mouse utility software. If one of those hangs while trying to initialize, it can block the shell from finishing its own startup, even though nothing about Windows itself is broken.
Difficulty: Easy | Time required: 5–10 minutes | Risk level: Low
When to use it: If the problem started shortly after installing new software, or if you’ve got a long list of programs configured to launch automatically.
Steps: 1. Open Task Manager and go to the Startup apps tab. 2. Sort by Startup impact and disable anything non-essential, paying particular attention to whatever you installed most recently. 3. Restart the PC and check whether the desktop loads normally. 4. If it does, re-enable the disabled apps one at a time, restarting between each, until you find the one that was causing the conflict.
Expected result: The desktop loads cleanly without hanging, confirming a specific startup app was the culprit.
Common mistakes: Disabling Microsoft-published startup entries along with everything else. Leave anything published by Microsoft enabled the goal is isolating third-party conflicts, not stripping the system down.
If it doesn’t work: Continue to Fix 7.
Fix 7: Boot Into Safe Mode
Why it works: Safe Mode starts Windows with only the essential drivers and services running no third-party startup apps, no non-critical drivers, nothing but the bare minimum needed to get a desktop on screen. If that bare-minimum desktop loads fine while the normal one doesn’t, you’ve just confirmed the cause is something specific being loaded normally a driver, an app, or a startup item rather than a fundamental problem with Windows itself.
Difficulty: Medium | Time required: 10–15 minutes | Risk level: Low
When to use it: Once Fixes 1 through 6 haven’t resolved things, or immediately if you can’t reach the desktop or Task Manager at all.
Steps: 1. Force a shutdown by holding the power button for about 10 seconds. Do this three times in a row after the third interrupted boot, Windows detects the pattern and launches Automatic Repair on its own. 2. On the Automatic Repair screen, select Advanced options. 3. Navigate to Troubleshoot > Advanced options > Startup Settings > Restart. 4. Once it restarts, press 4 (or F4) for standard Safe Mode, or 5 (F5) for Safe Mode with Networking if you’ll need internet access for later fixes.
Expected result: Windows boots to a lower-resolution desktop with “Safe Mode” labeled in each corner of the screen. From here, the deeper repair tools below become available.
Common mistakes: Letting go of the power button too early, or interrupting the third forced shutdown before it completes either one can prevent Automatic Repair from triggering.
If it doesn’t work: A black screen that persists even in Safe Mode points away from drivers and startup apps and toward corrupted system files or a disk problem. Move to Fix 8 through Fix 10, running them from the Recovery Environment’s Command Prompt if Safe Mode itself won’t load (Troubleshoot > Advanced options > Command Prompt).
Fix 8: Run an SFC Scan
Why it works: The System File Checker compares your core Windows files against a known-good reference stored locally and replaces anything that’s missing, altered, or corrupted. Quiet file-level corruption from a bad shutdown, a failed update, or disk errors is a common cause of shell failures that don’t show up anywhere else.
Difficulty: Medium | Time required: 10–20 minutes | Risk level: None
When to use it: Once you’ve reached Safe Mode or a Recovery Environment Command Prompt, especially if nothing so far has pointed to an obvious specific cause.
Steps: 1. Open Command Prompt as administrator from Safe Mode, search “cmd,” right-click it, and choose “Run as administrator”; from the Recovery Environment, select Command Prompt directly from the menu. 2. Type sfc /scannow and press Enter. 3. Let it run all the way through. It’s normal for the percentage to appear stuck at points don’t close the window.
Expected result: SFC finishes with either “Windows Resource Protection did not find any integrity violations” or a message that it found and successfully repaired corrupt files. Restart normally once it’s done.
Common mistakes: Closing the window because it looks frozen. SFC genuinely does pause at certain points, particularly around 30% and 60% that’s expected behavior, not a hang.
If it doesn’t work: Move on to Fix 9. SFC and DISM are meant to be used together DISM repairs the component store that SFC pulls its replacement files from, so running SFC alone sometimes finds problems it can’t actually fix.
Fix 9: Run a DISM Repair
Why it works: SFC repairs files by pulling clean copies from a local component store. If that store is itself damaged, SFC has nothing valid to restore from, even when it correctly identifies a problem. DISM repairs the component store directly, typically pulling replacement data from Windows Update.
Difficulty: Medium | Time required: 15–30 minutes, and it needs internet access | Risk level: None
When to use it: Right after running SFC particularly if SFC reported errors it wasn’t able to fix on its own.
Steps: 1. In the same administrator Command Prompt, run: DISM /Online /Cleanup-Image /RestoreHealth 2. Let it run. Depending on your connection speed, this can take 15 to 30 minutes, and the progress bar can sit still for stretches that’s normal. 3. Once it completes, run sfc /scannow again so it can apply any fixes DISM just enabled. 4. Restart the PC.
Expected result: DISM reports the restore operation completed successfully, and the follow-up SFC scan comes back clean.
Common mistakes: Running this without a working internet connection. DISM’s default repair source is Windows Update, and without connectivity it will either fail outright or hang for a long time before giving up.
If it doesn’t work: Continue to Fix 10 to check whether the disk itself is the source of the corruption DISM and SFC keep finding.
Fix 10: Run CHKDSK
Why it works: CHKDSK examines the file system and physical sectors of the drive holding Windows. If the drive has bad sectors or file system corruption, files can get damaged again almost as fast as SFC and DISM repair them CHKDSK addresses the underlying disk problem rather than its symptoms.
Difficulty: Medium | Time required: 15 minutes to well over an hour, depending on drive size | Risk level: Low, with one caveat below
Warning: The /f flag can require a restart partway through, and on a drive that’s already failing, interrupting the scan mid-repair can occasionally make data recovery harder afterward. If you have any reason to suspect a failing drive unusual noises, frequent freezes, slow performance back up what you can before running this.
When to use it: If SFC and DISM haven’t resolved the issue, or if you’ve noticed other signs of disk trouble unrelated to the black screen itself.
Steps: 1. In the administrator Command Prompt, type: chkdsk C: /f /r 2. If it reports the drive is in use and offers to schedule the check for the next restart, type Y and press Enter. 3. Restart and let the scan run uninterrupted. On an older or larger drive, this can genuinely take over an hour plan around that rather than assuming it’s frozen.
Expected result: CHKDSK reports that the file system was checked and any errors were corrected, and Windows boots normally on the next restart.
Common mistakes: Force-shutting down partway through out of impatience. This is one of the few steps on this list where interrupting it can make things worse rather than just wasting time.
If it doesn’t work: Move to Fix 11 to check whether the graphics driver itself is the direct cause.
Fix 11: Roll Back or Reinstall Your Graphics Driver
Why it works: A driver update that doesn’t play well with your specific GPU, or with the current Windows build, can prevent the desktop from rendering entirely while every other part of the system runs normally. This is one of the more common causes we see on systems that recently received an automatic driver update through Windows Update rather than the manufacturer’s own installer.
Difficulty: Medium | Time required: 10–20 minutes | Risk level: Low
When to use it: If the black screen started right after a driver update, or after physically swapping graphics cards.
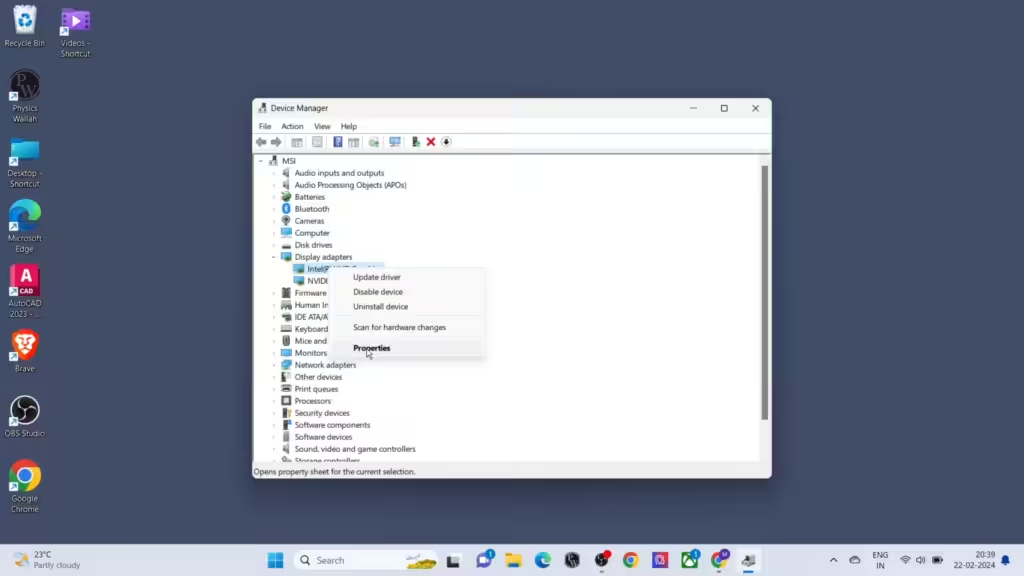
Steps: 1. From Safe Mode, press Windows key + X and choose Device Manager. 2. Expand Display adapters, right-click your GPU, and select Properties. 3. Open the Driver tab. If “Roll Back Driver” is available it’s grayed out if Windows has no previous version stored click it and follow the prompts. 4.
If rollback isn’t an option, click Uninstall device, checking “Delete the driver software for this device” if that box appears, then restart. Windows installs a basic fallback driver automatically on the next boot. 5. Once you’re back on the desktop, go directly to NVIDIA, AMD, or Intel’s website and download the current stable driver rather than letting Windows Update install one automatically going forward.
Expected result: The desktop renders normally, either on the previous driver version or the freshly reinstalled fallback.
Common mistakes: Installing the newest available driver again immediately after a rollback, before confirming the rolled-back version is actually stable. Give it a few days first.
If it doesn’t work: Continue to Fix 12.
Fix 12: Use System Restore
Why it works: System Restore reverts system files, installed drivers, and registry settings to an earlier snapshot, undoing whatever changed right before the black screen appeared without touching personal files like documents or photos.
Difficulty: Medium | Time required: 15–30 minutes | Risk level: Low it removes recently installed apps and drivers, but not personal files
Warning: Any application installed after the restore point you select gets removed along with it. If you’ve installed anything important recently, make a note of it before proceeding so you can reinstall it afterward.
When to use it: If restore points exist (see the prevention section below to make sure they do going forward) and none of the earlier fixes have worked.
Steps: 1. From Safe Mode or the Advanced Startup Options screen, go to Troubleshoot > Advanced options > System Restore. 2. Select your account and enter your password if prompted. 3. Choose a restore point dated before the black screen started ideally the day before a driver or Windows Update installed. 4. Click Next, confirm your choice, and let Windows finish the restore. The PC restarts automatically once it’s done.
Expected result: Windows boots normally, reverted to its state at the chosen restore point.
Common mistakes: Picking a restore point that’s too recent, from after the problem already started, or one so old it undoes unrelated changes you actually wanted to keep.
If it doesn’t work: If no restore points are available, or the restore itself fails partway through, move to Fix 13.
Fix 13: Run Startup Repair
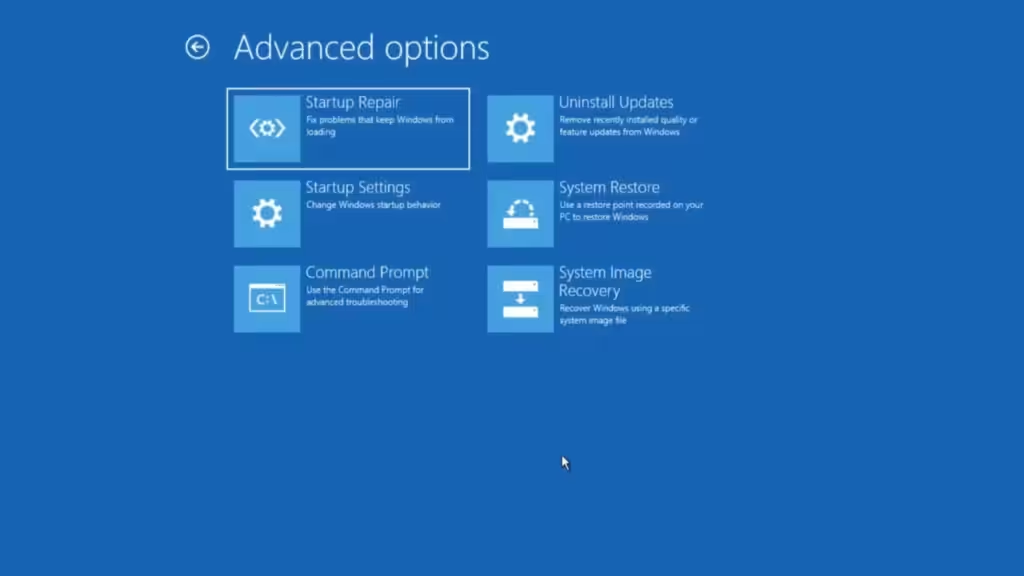
Why it works: Startup Repair is Microsoft’s automated diagnostic tool for common boot failures. It checks for and fixes a range of issues some boot configuration problems, certain system file faults that sit outside what SFC and DISM are built to catch.
Difficulty: Medium | Time required: 10–30 minutes | Risk level: None
When to use it: After System Restore, or as your next step if you don’t have restore points to fall back on.
Steps: 1. From Advanced Startup Options, select Startup Repair directly under Troubleshoot > Advanced options. 2. Choose your account and enter your password if asked. 3. Let Windows run its diagnosis and attempt repairs automatically. The screen can look inactive for a while that’s expected, not a freeze. 4. Once it finishes, the PC restarts on its own. Check whether the desktop loads.
Expected result: Windows either reports the repair succeeded, or that it couldn’t identify a fixable issue either way, it restarts so you can check the result directly.
Common mistakes: Treating a “couldn’t repair” message as the end of the road. It’s one diagnostic tool among several here, not a final verdict.
If it doesn’t work: Continue to Fix 14.
Fix 14: Uninstall the Most Recent Windows Update
Why it works: When the black screen started immediately after Windows finished installing an update, removing that specific update is usually faster and more precise than reverting the whole system with System Restore.
Difficulty: Medium | Time required: 10–15 minutes | Risk level: Low
When to use it: When the timing clearly lines up with a recent update particularly if Windows had you restart to “finish installing updates” right before the problem began.
Steps: 1. From Advanced Startup Options, go to Troubleshoot > Advanced options > Uninstall Updates. 2. Choose Uninstall latest quality update or Uninstall latest feature update, depending on which type installed most recently. 3. Confirm the removal and let Windows finish, then restart.
Expected result: The desktop loads normally with the problematic update removed. Windows typically won’t reinstall the same update immediately, which buys you time to check whether Microsoft has already released a fix before it comes back.
Common mistakes: Letting the same update reinstall right away without first checking Microsoft’s release health information or community reports for known issues.
If it doesn’t work: Move to the last-resort options in Fix 15.
Fix 15: New User Profile or Full Reset (Last Resort)
Why it works: If nothing above has resolved it, you’re most likely looking at either a corrupted individual user profile fixed by creating a fresh one or damage deep enough that the repair tools above can’t reach it, which a full reinstall clears out completely. Try the new profile first; it’s far less disruptive and rules out one specific cause before you commit to reinstalling everything.
Difficulty: Hard | Time required: 30 minutes to a few hours | Risk level: Medium to high
Warning: “Reset this PC” can remove installed applications even when you select “Keep my files,” and choosing “Remove everything” deletes your personal files outright. Back up anything you care about to an external drive or cloud storage before starting either option.
When to use it: Only once Fixes 1 through 14 have genuinely been exhausted.
Steps for a new user profile: 1. From Safe Mode, open Settings > Accounts > Other users, or use Command Prompt: net user newadmin /add followed by net localgroup administrators newadmin /add. 2. Sign out and log in with the new account. 3. If the desktop loads normally under the new profile, your original one was the problem. You can then copy personal files across from the old profile’s folder under C:\Users\ into the new one.
Steps for a full reset: 1. Go to Settings > System > Recovery > Reset this PC, or reach it through Advanced Startup Options if Settings itself isn’t accessible. 2. Choose “Keep my files” to preserve personal data while reinstalling Windows, or “Remove everything” for a completely clean install. 3. Follow the prompts. This reinstalls Windows from scratch and can take anywhere from one to several hours depending on your connection and drive speed.
Expected result: A clean, working desktop either under the new profile, or on a freshly reinstalled copy of Windows.
Common mistakes: Jumping straight to “Remove everything” without a backup, or skipping the new-profile test that might have saved hours of reinstalling for a problem that was really just one damaged account.
If it doesn’t work: A full reset that still produces a black screen is a strong indicator of a hardware fault most often the graphics card, RAM, or motherboard. At this point, professional diagnosis is the right next move rather than continuing to reinstall software.
Troubleshooting Table
| Symptom | Possible Cause | Recommended Fix |
|---|---|---|
| Cursor moves freely, nothing else responds | Windows Explorer crashed or never started | Fix 3 or Fix 4 |
| Black screen, Ctrl+Alt+Del does nothing at all | Deeper system, boot, or driver failure | Fix 7 (Safe Mode) |
| Started right after a driver update | Graphics driver conflict | Fix 1, then Fix 11 |
| Started right after a Windows Update | Failed or incompatible update | Fix 14, then Fix 12 |
| Only happens with an external monitor connected | Display output routing conflict | Fix 2 |
| Inconsistent fine on some boots, black on others | Corrupted Fast Startup snapshot | Fix 5 |
| Only affects one specific user account | Corrupted user profile | Fix 15 (new profile) |
| PC is also slow or freezing elsewhere | Disk errors | Fix 10 (CHKDSK) |
| Coincides with a particular app you use | Startup app conflict | Fix 6 |
| Screen shows brief artifacts, flickers, or color bands before going black | Likely graphics hardware or driver, not Explorer | Fix 11, then consider hardware causes |
When It’s Probably Hardware, Not Software
Most black screens after login are software problems, but a handful of signs point the other way, and it’s worth recognizing them early so you’re not stuck reinstalling Windows for the third time on a machine with a failing GPU.
Treat it as a likely hardware issue if:
- The screen flickers, shows garbled colors, or briefly displays visual artifacts before going black, rather than cutting to a clean black screen.
- A full “Remove everything” reset still produces the same black screen software reinstalls can’t fix physical damage.
- The problem appears intermittently regardless of what you do in Windows, but reliably gets worse when the machine has been running for a while (a sign of overheating).
- You hear unusual fan noise, smell anything burning, or notice the laptop getting unusually hot near the GPU.
- On a desktop, reseating the graphics card and RAM, and testing with a different monitor and cable, doesn’t change anything.
On older laptops especially, a black screen that only appears after the machine’s been running for 20 minutes or more, or that comes and goes with how much the fan is working, points toward heat rather than software cleaning dust from the vents is worth trying before anything on this list.
How Long Should You Actually Wait?
A common mistake is force-restarting a step that just needs more time. Rough benchmarks:
- Driver refresh (Fix 1): Should resolve within 10 seconds. If nothing’s changed after 30 seconds, it’s not going to.
- SFC scan: 10–20 minutes on a typical SSD, longer on a mechanical hard drive. Pauses around 30% and 60% are normal.
- DISM repair: 15–30 minutes with a decent internet connection. Can appear stalled for several minutes at a time that’s expected.
- CHKDSK with /f /r: 15 minutes to well over an hour depending on drive size and whether it’s an SSD or HDD. This is the step most often interrupted unnecessarily.
- Startup Repair: 10–30 minutes; the screen can look completely inactive during this.
- Full reset: One to several hours, depending mostly on internet speed if Windows needs to download files.
If a step is running noticeably longer than these ranges with genuinely zero activity no disk light, no change in over 20 minutes it’s reasonable to suspect it’s actually stuck rather than just slow, and to force a restart and try the next fix instead.
Common Mistakes to Avoid
- Reaching for a full reinstall immediately. It’s the most drastic option here and usually the least necessary one most black screens clear up with Fix 1 through Fix 6.
- Force-shutting down without a specific reason. Doing it three times deliberately to trigger Automatic Repair is a legitimate technique; doing it repeatedly out of frustration mid-repair can interrupt a process that was writing to disk and create new problems on top of the original one.
- Skipping backups before CHKDSK or a reset. Even the “Keep my files” reset option can behave unpredictably in edge cases back up first regardless of which option you plan to use.
- Letting Windows Update reinstall a driver right after rolling it back. Give a rolled-back driver a few days of stable use before allowing an update to touch it again.
- Ignoring what changed right before the problem started. The single most useful diagnostic clue available to you is the timing an update, a new driver, a newly connected peripheral, or freshly installed software almost always explains it.
How to Prevent This From Happening Again
- Make sure System Restore is turned on (Control Panel > System Protection) so a rollback point always exists if something goes wrong.
- Create a manual restore point before major updates, especially the large annual feature updates, which carry more risk than routine monthly patches.
- Update graphics drivers manually from NVIDIA, AMD, or Intel’s own site instead of relying on Windows Update, and consider hiding automatic driver updates through Windows Update’s advanced options.
- Keep a second administrator account you rarely use day to day, so you always have a working login available if your main profile ever gets corrupted.
- Delay feature updates for a few weeks using Windows Update’s pause option this lets early bugs get identified and patched by Microsoft before they reach your machine.
- Turn off Fast Startup if you’ve dealt with shell or login issues before. The boot-time savings are minor compared to the risk once you’ve been burned by it.
Signs the Problem Is Actually Fixed
A desktop that loads once doesn’t always mean the underlying cause is gone some of these issues are intermittent by nature. Before considering it resolved:
- Restart the PC at least twice more, doing a full shutdown-and-power-on rather than just a restart, to confirm it wasn’t a one-off.
- If the cause was a driver, confirm the desktop still loads normally after the next driver update this tells you whether the rollback actually held or whether the same conflict is waiting to happen again.
- If you disabled Fast Startup, leave it off for at least a week before considering re-enabling it, to be confident the corruption wasn’t going to resurface anyway.
- If a startup app was the culprit, check that re-enabling it (if you want it back) doesn’t bring the black screen with it sometimes an updated version of the same app resolves the conflict on its own.
Related Problems Worth Knowing About
A few issues share enough symptoms or causes with this one that it’s worth knowing they’re connected:
- Black screen before the login screen even appears. This points further back in the boot process than anything covered here it’s more often a boot configuration or hardware issue, and Startup Repair or a BIOS check is the more direct starting point.
- Desktop loads but the taskbar or Start menu is missing. This is usually a milder version of the same Explorer problem covered in Fix 3, rather than a separate issue.
- Blue or green screen with an error code instead of black. That’s a different failure category entirely a BSOD points to a driver or hardware crash with a specific stop code, which is diagnosed differently than a black screen.
- Black screen only during video playback or gaming, not at login. That’s much more likely to be a GPU driver or overheating issue isolated to graphically demanding tasks, rather than anything covered in this guide.
When to Contact Microsoft or a Repair Shop
Reach out for outside help once you’ve worked through the software fixes above and are seeing signs from the hardware section, or if:
- A full reset with “Remove everything” still results in a black screen.
- You’re not comfortable working inside the Windows Recovery Environment or running Command Prompt tools, and the earlier, simpler fixes haven’t worked.
- The PC is still under manufacturer warranty a hardware-suspected fault is often faster and cheaper to resolve through official support than by paying for independent repair.
- You’ve noticed physical warning signs: unusual heat, fan noise, or a burning smell.
Microsoft’s own support channels are a reasonable next step for software-side troubleshooting beyond this guide, particularly if you’re on a Microsoft 365 or Windows 11 Pro license with support entitlements. For anything pointing toward hardware, a local repair shop that can physically test the graphics card, RAM, and display connector directly will get you an answer faster than continuing to reinstall software.
Summary: Which Fixes to Try First
Start with the driver refresh shortcut and restarting Windows Explorer together, Fix 1 and Fix 3 resolve a large share of cases in under five minutes combined. If those don’t do it, work through Fast Startup, startup apps, and Safe Mode, then the SFC, DISM, and CHKDSK trio in that order.
Save System Restore, Startup Repair, and update removal for when a specific recent change looks like the likely trigger. Keep a new profile or full reset in reserve for once everything else has genuinely been ruled out most people never actually need to go that far, and recognizing the hardware warning signs early can save you from reinstalling Windows on a machine that needed a repair shop instead.
FAQ
Can a black screen damage my PC? No. A black screen after login is a software or driver display issue, not physical damage. Your hardware isn’t being harmed while the screen stays black, even if it sits that way for a while.
Will I lose my files? Almost never. Personal files stay on the drive no matter what’s causing the black screen. The one real exception is choosing “Remove everything” during a full reset, which is exactly why backing up first matters before that step specifically.
Why does only a cursor appear, with nothing else? That pattern almost always means Windows Explorer the process responsible for the desktop and taskbar crashed or never started, while the rest of Windows runs normally underneath it. If the cursor moves smoothly, that’s a good sign the core system is healthy.
Is a black screen with cursor after login a hardware problem? Usually not. It’s software in the large majority of cases. Treat it as a possible hardware issue only if you see flickering or color artifacts before the black screen, or if a full reset doesn’t fix it see the hardware section above for the full list of warning signs.
Can bad RAM cause a black screen after login? It’s possible, though less common than the software causes. Once every fix above has been ruled out, running Windows Memory Diagnostic searchable from Safe Mode checks specifically for RAM errors.
Can antivirus software cause this? Yes, on occasion. Some third-party antivirus suites hook deeply into the startup sequence and can conflict with the shell loading. Fix 6, disabling startup apps, is the fastest way to confirm or rule this out.
Why did this start right after a Windows Update? Updates can install an incompatible driver, interrupt a system file mid-write, or conflict with existing software. Fix 14, uninstalling the specific update, addresses this directly rather than requiring a broader restore.
Is it safe to force a shutdown to trigger Safe Mode? Yes, when it’s done deliberately. Holding the power button for a full shutdown, three times in a row, is a recognized and safe way to trigger Windows’ Automatic Repair environment.
Do I need internet access to fix this? Not for most of these fixes. SFC, CHKDSK, System Restore, and Explorer restarts all work completely offline. DISM’s default repair source does need an internet connection, though it can pull from a Windows installation image instead if you happen to have one.
Should I contact Microsoft Support or a repair shop? If you’ve worked through the full list without success, or you’re seeing signs from the hardware section above, that’s a reasonable point to get professional help rather than continuing to try software fixes on what may be a hardware problem.